Many people, including myself, have been hassled by the fact that you cannot add any custom entries to the AutoPlay menu in Windows Vista. You can only choose from the applications that Windows Vista wants to give you access to. To solve this problem, some suggest using TweakUI, which was designed for Windows XP, and run it in compatibility mode. Unfortunately this solution doesn't work, especially on Windows Vista 64bit. After a lot of research and testing I managed to find a rather unknown application which works both on the 32 and 64 bit versions of Windows Vista and gets the job done very easily. The application is called Autoplay Repair v2.2.2 and it was developed by a programmer named Darius Baczynski. To learn how to use it, click on 'Read more'.
First, you need to download and install Autoplay Repair. This can be done from the OrangeBlue site. Alternatively you can download it from our site, using the download link posted at the end of this article.
Once installed, you must run Autoplay Repair as administrator. To do this, right click on its shortcut and select 'Run as administrator'.
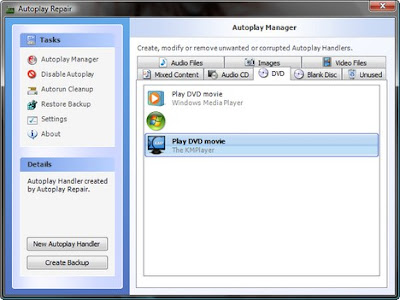
When working with Autoplay Repair, don't use the Autorun Cleanup. For some reason this feature is not compatible with Windows Vista and it will cause the application to crash. To add custom entries to Windows Vista's AutoPlay click on Autoplay Manager.
 There you will see lots of tabs, each containing the autoplay settings for different types of media. To add a new entry, click on the appropriate tab and then on the 'New Autoplay Handler' button highlighted in the screenshot below.
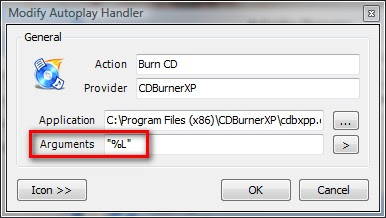
Next, type the name of the action that will be done and its provider. The provider should be the name of the application doing the action.
To explain better, I used KMPlayer as an example. KMPlayer is a good video player which doesn't get registered in Windows Vista's AutoPlay settings. I needed to add KMPlayer as one of my DVD movie players. Therefore, the name of the action is 'Play DVD movie' and the provider is KMPlayer.
After this, click on the button with three dots, browse and select the main executable file of the application.
Autoplay Manager will also set the icon shown in the AutoPlay menu as the default icon of the selected application. You can change it by clicking on the Icon button. Browse and select the file containing the desired icon. You will see all icons found in the selected file. Click on the one you want to use and then on OK.
 If you need to edit any of the available AutoPlay items, you can right click and select Modify. One option which I found very useful is to copy one AutoPlay entry from one tab to another. To do this, right click on the entry you want to copy, then on Send to and select the tab where you want to copy it.
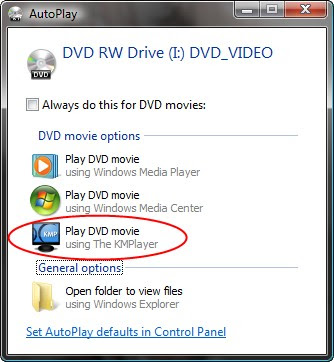
 Once you have added the entries that you need, you can test to see if your configuration works. As you can see from the screenshot below, when I insert a DVD movie, KMPlayer is now shown in the AutoPlay menu.
 Chances are, the application will work without any problems. If you want to send a 'Thank You!' to the person who programmed this application, go here and make a donation. I'm sure he will appreciate it.

0 comments
Post a Comment